Here are the simple 5 steps to connect you celling fan with light. Depending on the kind of fan you’re installing and how you want it to work, the task will vary. Most ceiling fan installations involve a few simple tools and an understanding of the wiring in the ceiling. Your objective may be to install a fan in a space without an existing switch source or to wire a ceiling fan with lights controlled by a single switch. This article will show you the optimal wiring techniques for four typical wiring scenarios.
Required equipment
- Protective glasses
- Screwdriver
- Circuit Tester
- Flexible Wrench
- Wire Cutter
- Working gloves
Also Read: Are Ceiling Fans Outdated
How to wire a ceiling fan with light: Guidance
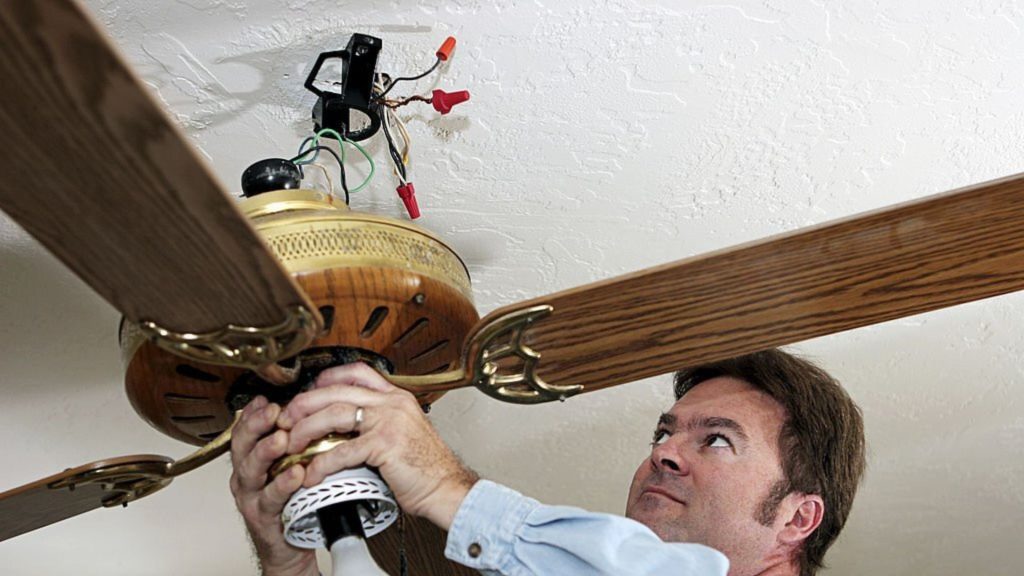
Even if you’ve previously tripped the switch, verify the electrical source before starting the project. In numerous instances, more than one power source was directed toward a specific ceiling box. When we reached inside, we had a pleasant surprise! It’s also crucial to remember that the fundamental approach outlined here remains the same even though some power supplies enter through the switch (instead of from above). What has changed is that you may now turn off the switch and securely deactivate the ceiling fan box. When replacing ceiling fans with a similar type, this is useful. Nevertheless, we still advise turning off the breaker in case someone comes over and tries to turn on the lights!
1. WITHOUT SWITCHES
When you are unable to run a switch into the room, we advise using this method. You must be able to deliver power directly to the fan from a nearby place for it to work. The fans all come with pull string switches to operate the fans and light kits, so it’s unquestionably a suitable wiring technique.
The fan and light are both powered by this straightforward connection. As would be expected, the ground and neutral wires are simply linked together. Black wires are normally used to power fan motors; however, most modern fans also have a separate blue cable that powers the lights. Even if you don’t intend to use a light kit, it’s still necessary to connect this line because it will allow the homeowner to setup one later without having to take out and fix the fan upward.
Also Read: Do Ceiling Fans Reduce Radon
2. CHANGING THE LIGHT AND OPERATING THE FAN
Inserting the switch allowed us to change the hot line that goes to the light kit. To create this loop, many people use a ground wire and a basic 12/2 Romex connector. If you choose to do this, you should tape the exposed white wire with black electrical tape. This shows that the wire is a “hot” wire and not a neutral line, which is important information for you and anybody else who works on the circuit in the future.
Although we just display a little piece of electrical tape, we advise wrapping it completely around the exposed white wire. Please take note that we chose to wire the fan motor straight to the power supply. This enables us to operate the draw cord on the fan to switch it on and off. Additionally, this keeps the fan operational regardless of where the wall switch is located. You’re ready to go once you’ve connected the ground and neutral wires.
3. CHANGING THE LIGHT AND FAN FROM DIFFERENT SWITCHES
The fundamental concept is that both switches are fed by your power supply line. The fan (black wire) or light kit is then fed by each switch (blue wire). At this stage, all that remains is to connect each ground wire and each neutral wire, respectively. Recall that we presumptively used 12/2 with ground for the lines leading to and from the switches; thus, be sure to clearly identify them as “hot” wires by rolling black tape around the white ends.
You are powering both switches with a single hot (black) wire in this situation. To accomplish this, connect both switches with a longer section of wire and jump it. Jumping entails removing the insulation from a short portion of wire. The size should be exactly right to loop around the hot terminal. The hot terminal of the first switch is then encircled by that exposed wire. Strip the end off last, then attach it to the second switch. The white wire, which you mark as a hot wire by taping black to both ends of it, and the red wire serve as the hot returns.
Also Read: Flush Mount vs Downrod Ceiling Fan
4. Utilize the same switch to turn on the light and the fan.
From the wall switch, it turns on the fan and the light. As a result, you can operate the fan’s wall switch to turn it on and off. To stop the fan motor, you don’t need to go over and pull the chain. You are entirely free to choose this wiring strategy.
Keep in mind that the switch is how power is fed. The switch provides electricity to both the light and the fan motor. As anticipated, the neutral and grounds are just hooked together, and everything is fine.
5. USING THE SINGLE SWITCH FOR A LIGHT AND A FAN AND ELECTRICITING THE SWITCH
If the switch itself has power rather than just being a ceiling fixture, The frequency with which this technique is used in older dwellings is found to be about 50%. Especially when the electrical wiring began in the crawl space, it happens. Moreover, this approach has a certain air of cleanliness.
Consistent wiring is used. No neutral wires have been re-labeled for you. Ceiling fan replacement is made simple by wiring. All power to the ceiling box is cut off by turning off the switch. It’s important to note that we still advise turning off the breaker and using a voltmeter to inspect your wiring.
In short, if you follow the above steps carefully, you will be able to wire a ceiling fan with light easily. You just need to be careful.
About The Author